
This document describes SDLIDE which, of the two, is the one more similar to the IDE supplied with BBC BASIC for Windows. It has the normal features which make up a modern Graphical User Interface (GUI): a title bar, a set of drop-down menus, a toolbar, an editing pane and a status bar.
You can move this window wherever you like on your desktop, and you can re-size it by dragging one of the corners or sides; you can also maximise it by clicking on the relevant button in the title bar. SDLIDE will remember the size of the window and set it to the same size when it is next started.
If you close the window (or choose the File... Exit menu selection) you will be prompted to save the current program if any changes have been made.
The menu bar contains the drop-down menus File, Edit, Utilities, Options, Run and Help. These menus may be activated by clicking on the appropriate menu name or by using a keyboard shortcut (hold down Alt and press the key corresponding to the underlined character). If any of the menu items are unavailable, they will be 'greyed out' and clicking on them will have no effect.
The toolbar provides easy access to the most common commands, without having to select them from the drop-down menus, simply by clicking on the appropriate button. If any of the commands are unavailable the button will be 'greyed out' and clicking on it will have no effect. The commands for which buttons are provided are as follows:
From the File menu: New,
Load, Save and
Print.
From the Edit menu: Undo,
Redo, Cut, Copy,
Paste, Find and
Replace.
From the Utilities menu: Renumber
and Compile.
From the Run menu: Run, Debug,
Stop, Pause, Step Into,
Step Over and Immediate.
From the Help menu: About.
When a menu item is highlighted, the status bar displays a brief description of the function of that command. Otherwise, the status bar is split into five regions: a message region, the current character encoding, the current length of the BASIC program, the current position of the text cursor (caret) in the editing pane and the current Insert/Overtype status.

The file menu is concerned with loading, saving and comparing BBC BASIC programs, and with exiting from BBC BASIC for SDL 2.0. The file menu can be accessed by clicking on its name in the menu bar or by means of the keyboard shortcut Alt-F.
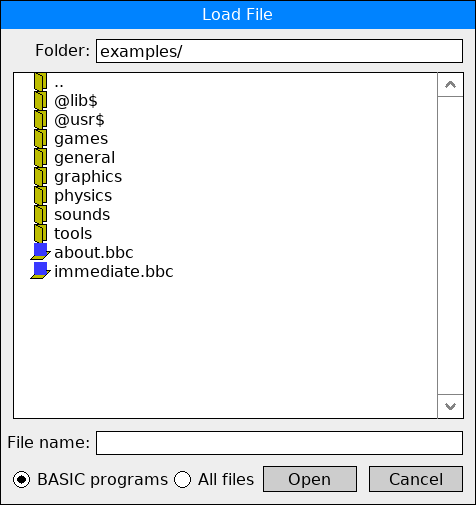
If the previous program was not saved, you are first prompted to save it.
If the program was not loaded from a file (i.e. it was typed in or imported via the clipboard) or it was loaded from an Acorn-format file, the Save command will display the Save As dialogue box so you can enter the desired filename and format. If the current BASIC program is unchanged, so it doesn't need to be saved, the Save command is inhibited.
The effect is similar to the Paste command, except that the inserted lines are read from a file (and may be in any of the formats accepted by the Load command).
If there are a large number of changes, or the programs are totally dissimilar, it can take a long time before the differences are displayed. Pressing the Escape key will abort the process.
You can force a 'new page' by including the following statement in your program:
When the statement is encountered printing will continue at the top of the next page (this feature may not work with all printers).REM!Eject

The edit menu is concerned with editing or searching the current BBC BASIC program (i.e. the program loaded into memory). The edit menu can be accessed by clicking on its name in the menu bar or by means of the keyboard shortcut Alt-E.
Selected text is highlighted in reverse-video. You can select text in the following ways:
See Cut for details of how text may be selected.

To start the search click on Find Next or press the Return (Enter) key. The search begins at the position of the text cursor (caret) when the Find command was issued. If you want to search the entire program, ensure that you move the cursor to the start of the program before issuing the command.
If the specified text is found it is highlighted (i.e. selected) and the cursor is moved to the end of the highlighted region. The display is automatically scrolled so that the selected text is visible. Clicking on Find Next again causes the search to resume from this point and the next occurrence of the text (if any) to be found. If the text is not found before the end of the program the message "String not found" is displayed; clicking Find Next again causes the search to restart from the beginning of the program.
You can click on Cancel at any time to abort the search and dismiss the dialogue box.
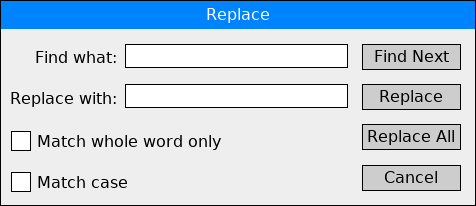
To start the search click on Find Next or press the Return (Enter) key. The search begins at the position of the text cursor (caret) when the Replace command was issued. If you want to search the entire program, ensure that you move the cursor to the start of the program before issuing the command.
If the specified text is found it is highlighted (i.e. selected) and the cursor is moved to the end of the highlighted region. The display is automatically scrolled so that the selected text is visible. To confirm that you want the text to be replaced click on Replace; this will replace the text and search for the next occurrence (if any).
Alternatively if you do not wish to replace this occurrence of the text click on Find Next. This will skip the replace operation and search for the next occurrence of the text (if any). If the text is not found before the end of the program the message "String not found" is displayed.
If you are certain that you want every occurrence of the text (from the current point to the end of the program) to be replaced, click on Replace All.
You can click on Cancel at any time to abort the search and dismiss the dialogue box.
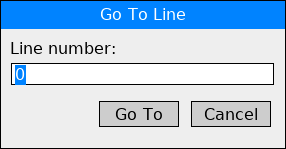
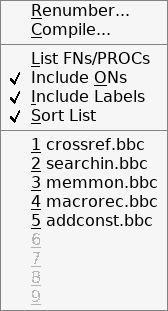
The utilities menu contains commands to aid debugging of your BASIC program, to renumber your program and to convert your program to a distributable bundle. The utilities menu can be accessed by clicking on its name in the menu bar or by means of the keyboard shortcut Alt-U.

Renumbering your program can be useful when debugging, because if an (untrapped) error occurs the line number at which the error occurred is displayed. Once your program is complete and debugged, you may prefer to remove the line numbers so as not to clutter the program listing.
The Renumber command will fail if the specified increment is zero or if the specified values would result in a line number greater than the maximum allowed (65535).
You can alternatively create an application bundle which can be hosted online and run in a suitable web browser (that is, a browser which supports the Web Assembly Threads feature). At the time of writing most desktop browsers are compatible, except Internet Explorer. Some Android browsers are also compatible (e.g. Chrome and Firefox) plus Safari on iOS.
The Compile command opens a dialogue box which allows you to choose the name and file path of the application bundle, select an appropriate icon and choose whether or not to 'crunch' the program:
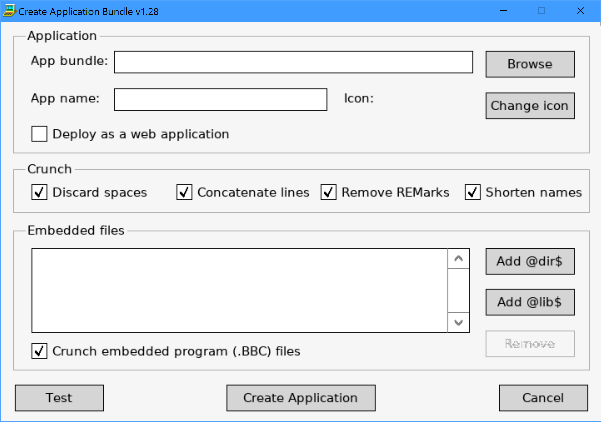
By default the application bundle is stored in the exe subdirectory of the directory (folder) containing the BASIC program. This ensures that it is safe to run the 'compiled' program without any risk of embedded files, when extracted, overwriting wanted original files in the source directory.
The name of the application may be entered directly or set by using the REM!Appname compiler directive. This is the name which will normally be associated with the application's desktop icon.
You can change the icon asssociated with the application bundle by using the REM!Icon compiler directive or by clicking on the Change Icon button. The icon must be a file in PNG format (which may include transparency), ideally in a square format and a resolution of at least 256x256 pixels (in the case of MacOS, exactly 256x256 pixels). Please respect Copyright, and use only an icon which you have generated yourself or have legitimately obtained for this purpose.
Selecting the Deploy as a web application checkbox causes the compiler to generate a web bundle (.bbb file) which may be hosted online and run in a suitable web browser using this URL:
replacing URL-of-bbb-file with the URL of your uploaded web bundle (this may be a Dropbox link). There is a backup server in case of downtime, to use it substitute .net for .co.uk in the above URL.https://wasm.bbcbasic.co.uk/bbcsdl.html?app=URL-of-bbb-file
When using the Remove REMs and Abbreviate names options you can include verbose comments in your program, and use long descriptive variable names, without the size or performance of the final compiled program being affected. In this way you can accord with good programming practice and make your 'source' program easier to understand and modify.
Although you can normally 'crunch' a program without it having any unwanted side effects, there are a few circumstances when it is incompatible with correct program operation:
Files loaded this way will automatically be incorporated in the compiled application bundle and extracted to appropriate locations on the target machine; alternatively you can specify which files should be embedded by using the REM!Embed compiler directive.INSTALL @lib$+"dlglib" OSCLI "DISPLAY """+@dir$+"graphics.png"""
You can manually edit the list of embedded files using the Add @dir$, Add @lib$ and Remove buttons; the remove button deletes a selected (highlighted) entry in the list. But since you would need to do this every time the Compile command is issued it is not recommended.
Embedded files may come from the @dir$ or @lib$ folder, or a subfolder of either of these. This can be useful if your program uses many resource files, perhaps sound files or graphics files, and you prefer not to clutter up your program's folder with them. By creating subfolders called, for example, sounds and images you can keep your files organised. In your program you could access these files as follows:
OSCLI "DISPLAY "+@dir$+"resources/images/picture.jpg"
You can choose to crunch embedded BBC BASIC (tokenised) program files, as well as the main program. If this option is selected any embedded files with a .bbc extension are crunched as if they were part of the main program. The same crunch options are used, and in the case of the abbreviate names option the same abbreviations are used. This ensures that any variables or structures shared between the main program and external modules, imported using INSTALL or CALL, will remain consistent. You must ensure that all imported modules are embedded, otherwise function and procedure names, and global variables, will not be consistent (unless you use the REM!Keep compiler directive to prevent the names being abbreviated).
Note that it is not intended that this facility should substitute for a proper installer. If you need to do anything more complicated on installation than copying 'resource' files to the destination PC you should consider using an installer utility, for example the free Inno Setup program in Windows.
If Deploy as a web application has been selected this will automatically upload your 'compiled' program to a web server and run it using your default browser (this will not work if your default browser is Internet Explorer).
The compiler directives must be entered exactly as shown; they are case-sensitive. They may be included anywhere in your program. In the following list square brackets indicate optional parameters:
REM!Exefile bundlefileThis directive allows you to specify the path and filename for the application bundle, if it is different from the default. If you omit the extension, an appropriate extension will be added for the platform you are using (.exe for Windows, .dmg for MacOS, .zip for Linux). If you specify a .bbb extension, a web bundle will be created for running in a browser.
REM!Appname application nameThis directive allows you to specify the application's name.
REM!Icon iconfileThis directive allows you to specify the path and filename of a PNG file containing the image which should be used as the application's icon.
REM!Crunch [spaces][,lines][,rems][,names][,embedded]This directive allows you to specify whether the program will be crunched, and if so which crunch options are used. You can also specify that any embedded .bbc (program or library) files should also be crunched.
REM!Embed [file1][, file2...]This directive allows you to specify which files should be embedded in the executable. The files must be specified in the form @dir$+"filename" or @lib$+"filename". You may include more than one REM!Embed line if there are many such files or (in version 1.39a or later only) you may use wildcards. The presence of one or more REM!Embed directives overrides the selection of embedded files by other means, so every file that you need to be embedded must be specified using the directive.
REM!Resource [file1][, file2...]This directive allows you to incorporate Windows Resources in an executable (.exe) file. The resources must be specified in the form @dir$+"filename" or @lib$+"filename" and they must be in the standard '.res' file format. One file can contain any number of resources, but you may include more than one REM!Resource line if desired. Resources that you might want to include are typically Version Information and/or a custom Manifest. The directive is ignored when building an application bundle for a different platform (MacOS, Linux or in-browser).
REM!Keep var1[, var2, var3...]This directive allows you to specify a list of variable, array or structure names which will not be abbreviated, even when the REM!Crunch names option has been selected. This is useful if you refer to named variables in a DATA statement or using EVAL but you still want to abbreviate the remaining variable names for best performance. Note that such variable names must have at least three characters (excluding the type character, if any) to minimise the risk that they will clash with one of the automatically-generated abbreviated names. You may include more than one REM!Keep line if there are many such variables.
You can also specify that a procedure or function name should not be abbreviated:
Note that in this context PROC and FN must be in capital letters, even if you use the Lowercase keywords option.REM!Keep PROCmyprocedure, FNmyfunction()
Apart from REM!Embed and REM!Keep it is not useful to have more than one directive of the same kind; if you do the one that is latest in the program will be used.
Here is an example set of compiler directives:
REM!Exefile /temp/myapp
REM!Appname My Application
REM!Icon /icons/myapp.png
REM!Crunch spaces, lines, rems, names, embedded
REM!Embed @dir$+"images/owl.bmp", @lib$+"ogllib"
REM!Keep header$, footer$

The options menu allows you to configure SDLIDE to suit your own preferences. These preferences are saved on exit, and are re-established whenever you run SDLIDE in the future. The options menu can be accessed by clicking on its name in the menu bar or by means of the keyboard shortcut Alt-O.
When Syntax Colouring is disabled, all the program is listed in black (white when in Dark Mode).
When Lowercase Keywords mode is disabled, keywords are only accepted in all capitals and are listed in capitals. This mode is the default and is compatible with earlier versions of BBC BASIC.
Be aware that if you contrive to have (for example) two NEXT statements which match the same FOR statement, or vice versa, the resulting indentation will not be correct. In a well-structured program you would hopefully never do this anyway!
Note that Unicode text is encoded as UTF-8 within your program; if you want to display it at run time you will need to use the UTF-8 option provided by the VDU 23,22 command. You may also need to make use of the functions supplied in the utf8lib library.
The editor supports languages written Right-to-Left (e.g. Hebrew) and Complex Script languages (e.g. Arabic), in string constants (i.e. enclosed in double-quotes) and REMarks, but for this to work the version of SDL2_ttf in use must be at least 2.20.0.
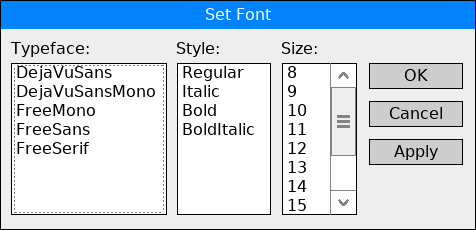
The fonts listed are those in the BBC BASIC for SDL 2.0 lib/ folder.
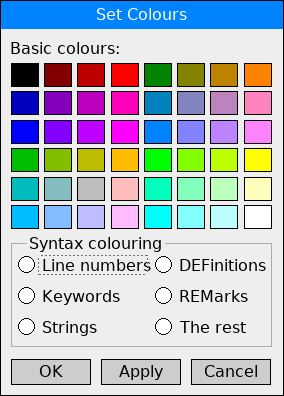
Selecting the appropriate syntactical element causes the current colour for that element to be identified by means of a box around the colour sample. You can change the colour for that element simply by clicking on the appropriate coloured rectangle, and then clicking on OK or Apply (OK closes the dialogue box, whereas Apply leaves it open so that further changes can be made).
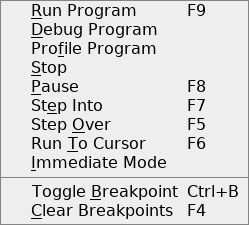
The run menu is concerned with running and debugging your BBC BASIC program. The run menu can be accessed by clicking on its name in the menu bar or by means of the keyboard shortcut Alt-R.
In the case of arrays and structures, only the name is displayed; the values of the individual elements or members are not. If you need to monitor them, add an appropriate statement or statements to your program to copy the value to a conventional variable.
If you click on a variable name it will be highlighted and the List Variables window will keep that variable in view when it scrolls. To clear the highlight, and restore free scrolling, right-click in the window.
If you want to keep a copy of the profiler report, or print it out, you can find it as the plain text file profiler.rpt in your temporary directory (if you don't know where that is, enter PRINT @tmp$ at the immediate mode command prompt).
Note that any ON CLOSE routine in your program will not be executed. It is therefore better to use the normal methods of ending your program (e.g. clicking on the Close button) when possible and to use the Stop command only as a last resort.
If the program is not currently running in debug mode the Stop command is inhibited.
If the program is not currently running in debug mode the Pause command is inhibited.
If the program is not currently paused, the Step Into command is inhibited. If you want to single-step through only a specific part of your program, add a breakpoint where you want to start stepping. Alternatively add a TRACE STEP ON statement at that point or use the Run To Cursor command.
If the program never executes a statement in the next line, it will not pause. If the program is not currently paused, the Step Over command is inhibited.
The first (or only) statement in the line containing the cursor is executed before the program pauses. If the program never executes a statement in the line containing the cursor, it will not pause. Once the program is paused, issuing the Run To Cursor command again (or pressing F6) will cause execution to continue from that point; the program will pause again if there are more statements in the line, or if the line is reentered later.
Note that the program will not pause on any of the following lines:
Immediate Mode can also be useful for doing things like deleting a file (*DELETE), or displaying a disk directory (*DIR). When in immediate mode you can execute the current program by typing RUN.>PRINT 2+2
You cannot dynamically add or remove breakpoints while the program is running, any changes willl take effect only when you run the program again.

The help menu gives access to the BBC BASIC for SDL 2.0 documentation, provides links to information via email or from the web, and displays version information. The help menu can be accessed by clicking on its name in the menu bar or by means of the keyboard shortcut Alt-H.
| Key | Operation |
|---|---|
| Insert | Toggle between insert and overtype mode. In overtype mode any character typed will over-write the existing character at that position on the line. In insert mode any character typed will 'push' the rest of the line to the right to make room. The insert/overtype status is indicated in the status bar. |
| Delete | If any text is selected (highlighted) it is deleted, without being copied to the clipboard. Otherwise, the character to the immediate right of the cursor (caret) is deleted and the rest of the line is moved left to fill the gap. |
| Home | Move the cursor (caret) to the start of the current program line, and scroll the display horizontally (if necessary) to ensure that the cursor is visible. |
| Ctrl+Home | Move the cursor (caret) to the start of the program, and scroll the display horizontally and/or vertically (if necessary) to ensure that the cursor is visible. |
| End | Move the cursor (caret) to the end of the current program line, and scroll the display horizontally (if necessary) to ensure that the cursor is visible. |
| Ctrl+End | Move the cursor (caret) to the end of the program, and scroll the display horizontally and/or vertically (if necessary) to ensure that the cursor is visible. |
| Page Up | Display the previous 'page' of the program by scrolling the display down by one screenful (less one line) or until the first line of the program is visible, whichever is less. If the first line of the program is already in view, Page Up has no effect. |
| Page Down | Display the next 'page' of the program by scrolling the display up by one screenful (less one line) or until the last line of the program is visible, whichever is less. If the last line of the program is already in view, Page Down has no effect. |
| Move the cursor (caret) one character to the left, and scroll the display horizontally (if necessary) to ensure that the cursor remains visible. If Shift is held down, select (or de-select) a character. If the cursor is already at the beginning of a line, the key has no effect. | |
| Move the cursor (caret) one character to the right, and scroll the display horizontally (if necessary) to ensure that the cursor remains visible. If Shift is held down, select (or de-select) a character. | |
| Move the cursor (caret) up one line, and scroll the display vertically (if necessary) to ensure that the cursor remains visible. If Shift is held down, select (or de-select) a line. If the cursor is already on the first line, the key has no effect. | |
| Move the cursor (caret) down one line, and scroll the display vertically (if necessary) to ensure that the cursor remains visible. If Shift is held down, select (or de-select) a line. If the cursor is already on the last line, the key has no effect. | |
| Backspace | Delete the character immediately to the left of the cursor (caret), and move the cursor left one position. The rest of the line, to the right of the cursor, is moved left to fill the gap. If the cursor is at the beginning of a line, delete the preceding 'new line' and concatenate the contents of the present line onto the end of the previous line. |
| Return (Enter) | Insert a 'new line' at the current position of the cursor (caret). Everything to the right of the cursor will be moved onto the next line, and the rest of the program is moved down one line to make space. By this means you can split an existing line into two or more lines |
| Ctrl+ |
Move the cursor (caret) one word to the left, and scroll the display horizontally (if necessary) to ensure that the cursor remains visible. If Shift is also held down, select (or de-select) a word. |
| Ctrl+ |
Move the cursor (caret) one word to the right, and scroll the display horizontally (if necessary) to ensure that the cursor remains visible. If Shift is also held down, select (or de-select) a word. |
| Tab | Normally has no effect, but can be programmed to execute a macro. See the macrorec.bbc add-in utility supplied. |
| Ctrl+Backspace | Delete the previous word (i.e. to the left of the cursor) and move the rest of the line left to fill the gap. |
| Ctrl+Delete | Delete the next word (i.e. to the right of the cursor) and move the rest of the line left to fill the gap. |
The 'printing' keys (letters, numbers and symbols) cause the appropriate character to be entered at the position of the cursor (caret), and the cursor is then moved right by one position. If anything is selected (highlighted) when the key is pressed, it is first deleted.
| Action | Operation |
|---|---|
| Left click | Clicking in the editing pane with the left mouse button causes the text cursor (caret) to be moved to the character position nearest to the mouse pointer. If Shift is held down, the region between the previous position of the text cursor and the new position will be selected. |
| Left double-click | Double-clicking in the editing pane with the left mouse button causes the word under the mouse pointer to be selected; if the same word is present elsewhere in the program it is highlighted with a light blue background. The text cursor (caret) is moved to the end of the selected region. The selected word can then be cut, copied or deleted. If the Find or Replace command is issued, the selected word is copied to the Find What field. |
| Left drag | Holding down the left mouse button and 'dragging' the mouse pointer over the program displayed in the editing pane causes a section of the program to be selected. Dragging the mouse horizontally selects part or all of a line; dragging the mouse vertically selects a block of lines (only entire lines may be selected). |
| Right click | Clicking in the editing pane with the right mouse button causes the Context Menu to be displayed. |
| Wheel | Operating the mouse wheel causes the editing pane to scroll vertically, usually by one line per 'notch'. |
Clicking on Add REMs automatically adds a REM to the start of each line in the selected block. If every line already starts with a REM, the context menu contains the Remove REMs command.
These are the settings that you will most likely want to modify (they may not be consecutive in the file); do not edit the file while SDLIDE is open, since your changes will be overwritten when it is closed:
Change the sizes approximately in proportion to how your resolution compares with the standard 96 dpi. For example if your display resolution is around 192 dpi change the font sizes from 12 to 24 and the guiscale from 2 to 4. You may need to experiment for optimum results.windowwidth=960 windowheight=600 editfont="..../lib/DejaVuSansMono",12 guifont="..../lib/DejaVuSans",12 guiscale=2
Please note that whilst these changes will scale the SDLIDE window they will not affect the immediate mode output window nor the output from your BBC BASIC programs. You will need to write your programs to work acceptably over the range of DPI values that they may encounter in use. The @zoom% system variable may be particularly useful for this.
|
CONTINUE
|